The superb blog 1100
Floating decks and cantilevered swimming pool dealing appearance simple when they are done right. Tidy lines. Limited joints. No noticeable mastic. The water side reads as one continuous plane of stone or tile, and the deck seems to float. Yet what you see is the easy component. The job that maintains it looking that way for 10 or two decades is hidden in the concrete, the waterproofing, and the joint layout.
I have actually walked a lot of tasks where the coping was stunning on day one, after that cracked, raised, or stained within a couple of seasons due to the fact that the framework and movement joints were treated as an afterthought. If you want a drifting deck with hidden growth joints around a swimming pool, you need to start the layout from the bond beam out, not from the pavers in.
This is a deep study just how to develop and construct that system appropriately, with certain focus to regular concrete swimming pool construction, resurfacing, and coating choices.
What "floating" really indicates at the pool edge
When individuals say drifting deck at a pool, they usually mean three related ideas.
The first is aesthetic splitting up. The deck surface area shows up to move past the swimming pool, usually with a shadow reveal, a slim port, or a darkened joint. You do not see a huge grain of mastic. The coping and deck might get on the same airplane or slightly offset, however they review as separate masses.
The secondly is architectural self-reliance. The pool covering and bond beam action one way. The bordering deck piece relocates one more, driven by dirt, temperature, and load. A true floating system decouples those activities with a control joint, backer pole, and sealer, often tied into a waterproofing membrane layer. It is not simply a saw cut; it is a developed activity joint.
The third is concealed control of cracks. The joint lines, the places of chilly joints in the pneumatically used concrete, the changes at skimmers and swimming pool light niches, all of that is arranged to make sure that when the concrete reduces or the subgrade works out, the hairline cracks run where you intended, not diagonally across a coping rock or via a line of glass mosaic tile.
Get those 3 right and the visual details form. Skip them and you end up chasing after plaster delamination, loose coping, and duplicated mastic joint replacement.
Starting at the swimming pool bond beam
Most floating deck and cantilevered coping failures map back to the swimming pool bond beam. The most effective deck outlining can not deal with a weak or over cut beam.
On renovation job, the primary step is always medical diagnosis. Before any person touches the coping or deck, I like to see a current swimming pool pipes pressure examination and an architectural survey of the pool replastering covering. If you have unaddressed leakages, dirt movement, or considerable fracturing that calls for Gunite resurfacing or Shotcrete repair, those problems need to be handled prior to you hang a precision deck system on the edge.
Pool shell preparation is more than cleaning. It usually includes substrate scarification along the bond beam of light and any kind of flaked locations. Old spots, paint, and breakable plaster have to come off. I desire tidy, mechanically profiled concrete to make sure that hydraulic concrete, waterproofing membrane, and floor tile underlayment have dependable bite.
Where the bond light beam has actually spalled, eroded, or been hacked back in a prior remodel, you rebuild it square and real with suitable repair work mortar or pneumatically applied concrete. It is common on older swimming pools to locate spaces around skimmer throats and light particular niches. Those areas get special attention: skimmer throat repair work with properly bonded hydraulic concrete, combination behind the wall, and sealing around pool light specific niches so you are not counting on a slim plaster layer to quit water migration.
Only as soon as the bond beam of light and top shell are structurally sound do I think about the coping layout.
Choosing the coping: form, material, and behavior
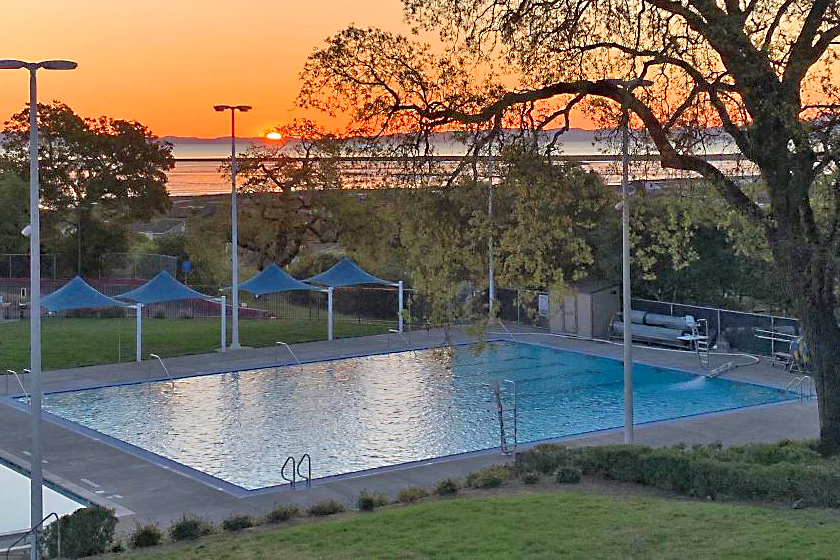
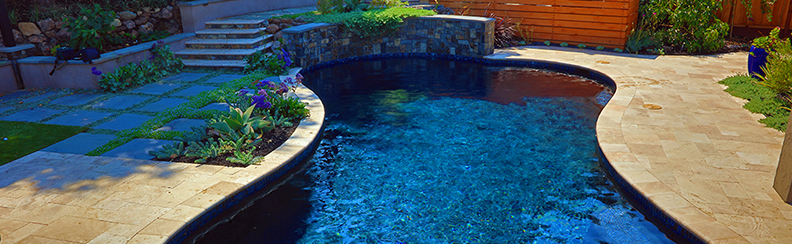
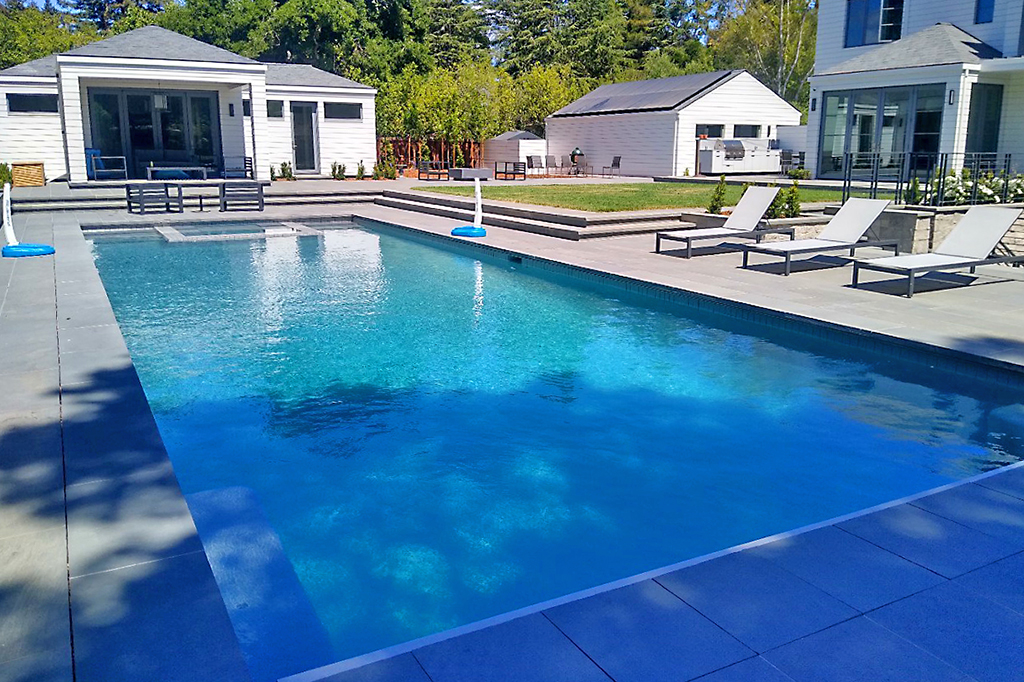
For a floating deck, the coping is normally the visual support. It specifies the waterline and the viewed density of the swimming pool wall surface. One of the most common choices in my jobs have been travertine coping, poured in location concrete, big style porcelain, or thick natural stones like limestone and granite. Exposed bullnose block still appears on some traditional jobs, however it can be visually heavy with a modern-day floating edge, so it requires careful proportioning.
Travertine coping works magnificently with drifting systems since it can be milled precisely, it is comfortable underfoot, and it couple with a wide range of waterline ceramic tile and interior surfaces like Ruby Brite, Hydrazzo, PebbleTec, or quartz aggregate coating. The secret is to make use of complete thickness coping stones with enough depth right into the deck to lug a clean cantilever.
Cantilevered coping can be achieved in two fundamental ways. One is monolithic: the coping is cast as component of the bond beam of light, making use of concrete forms that develop the overhang. The 2nd is layered: the bond light beam is raised to a right, level airplane, after that coping stones are set in thin or moderate bed mortar, projecting over the water.
Monolithic cast in place coping is durable and budget-friendly, however more challenging to fix in a partial remodel. Rock or ceramic tile coping on a well ready beam of light is less complicated to level exactly and can be gotten rid of and reset throughout future remodellings. For a refined floating deck information, I typically prefer stone coping for the crisp joint control.
The bottom of a cantilever need to not be forgotten. I have seen shotcrete repair service where the underside of the overhang was left rough, then plastered inconsistently. Under solid light, it looks incomplete. A neat, troweled bottom or a tiny reduced arris on a stone coping reviews far better when swimmers remain in the water looking up.
Setting the waterline: ceramic tile, plaster, and movement
The user interface in between the waterline floor tile and the coping is where numerous "hidden" joints live. It is likewise where dissimilar densities and careless cement shade matching are painfully obvious.
When I am making a brand-new side, I like to select the waterline ceramic tile and the indoor surface at the same time. Hydrazzo, Diamond Brite, quartz aggregate surface, PebbleTec, and subjected pebble surface all have various visual weights and appearances at the waterline. A dark Hydrazzo interior with light travertine coping, for instance, sets well with a tool tone glass mosaic floor tile that connects the contrast. If the client demands white line plaster on top, the joint spacings at the ceramic tile end up being much more vital, since the white band will aesthetically amplify any roaming lines.
Beneath the floor tile, the bond light beam needs a suitable ceramic tile underlayment or float coat, adhered to the scarified concrete. The ceramic tile setter need to not be trying to fix structural humps and hollows with setting mortar alone. An appropriate float layer lets you keep a straight, regular bed for waterline tile and a cool underside for the cantilever.
Movement joints in the ceramic tile field commonly obtain disregarded. Think about where the expansion joint between the swimming pool and deck will certainly drop in connection to your floor tile grid. If the concealed joint lands specifically in the center of a row, you might require to present a soft joint in the grout or coordinate cement color matching with the sealer to make sure that the line goes away aesthetically. A neutral grey Deck-O-Seal, matched closely to the joint grout, can make a remarkably tidy transition.
On remodels with existing ceramic tile, a Muriatic acid laundry is sometimes made use of to tidy calcium and surface area discolorations prior to new coping or decking incorporate. It is a helpful tool, however it has to be managed. Hostile acid etching can compromise cement and accelerate plaster delamination at the waterline if the interior coating is currently low. I favor to deal with architectural issues first, then make use of a light Muriatic acid laundry only as needed, well counteracted and rinsed.
The anatomy of a covert growth joint
A concealed joint is never absolutely unseen. It is camouflaged by proportion, darkness, and color, not absent. The failing point on several jobs is that the joint is treated as a grain of caulk thrown in after the truth, as opposed to a layered setting up that starts from the shell.
Here is a simplified list of the layers around a pool perimeter joint in a drifting deck system:
- Structural separation in between pool bond light beam and deck slab or base, typically recognized as a seclusion joint, foam strip, or developed gap. Waterproofing membrane layer that connects up the swimming pool side and stops short of the deck, so water moves back right into the covering, not into the dirt or subgrade. Backer pole sized appropriately for the joint size, set at a depth that enables the sealer to form a hourglass shape and relocate properly. Sealant such as Deck-O-Seal or a compatible polyurethane or silicone, picked for UV and chemical resistance, tooled neatly to shed water. Visual concealing with darkness discloses, matching grout color, or minor recess to ensure that the joint reads as a building line, not a repair.
On a real floating deck, that joint runs continuous around the swimming pool. Do not avoid it across actions, elevated walls, or at skimmer throats. Instead, treat each of those as a specialty area where the joint may jog or widen, however the separation in between shell and deck stays intact.
I once examined a project where the expansion joint stopped for 4 feet at a raised wall, then returned to. Within three years, the coping rocks at the break had actually broken and shifted. The deck slab had no place to relocate at that wall surface, so it simply required its way with the weakest point.
Floating decks over concrete versus mounted structures
The term drifting deck gets utilized freely. Around swimming pools, you typically see either a concrete deck piece divided from the shell, or a framed deck, often steel or wood, constructed over a void or piers.
Concrete decks are the standard option and pair well with pneumatically used concrete pools. The trick is to stay clear of "pinning" the deck to the swimming pool bond light beam. Do not run rebar continually from the deck piece right into the beam of light where you anticipate a movement joint. Usage dowels only where you mean structural connection, such as under a fully monolithic spillway or incorporated increased beam.
Framed decks act in different ways. They are lighter, much more versatile, and typically make use of a waterproofing membrane over an architectural piece, then sleepers and coating boards above. When I incorporate a cantilevered coping with a mounted deck, I such as to maintain a clear air void or a compressible filler between the bottom of the deck system and the rear of the bond beam of light. The coping is supported completely by the swimming pool structure; the deck floats simply behind it.
In both instances, waterproofing is non flexible. A robust waterproofing membrane layer on the deck side, lapped properly to the pool side describing, prevents consistent wetting of the subgrade and the rear of the bond beam. Saturated soils are a peaceful awesome, especially when a pool has low drainage or rests near extensive clay.
Working around skimmers, lights, and details
Features that damage the tidy line of the swimming pool boundary are where most concealed joints fall short. Skimmers and light particular niches specifically need thoughtful staging.
On a remodel, skimmer throat repair frequently comes first. Old skimmers might have hairline cracks, voids, or poorly bonded patches. Before new coping, the skimmer mouth is settled, loosened material removed, and voids packed with hydraulic cement. I desire an audio concrete structure to lug the coping stone and waterline ceramic tile, not a hollow covered with weak grout.
The growth joint ought to normally connect across the back of the skimmer, not quit at its sides. That can imply a slightly broader space at that location, thoroughly secured and completed to ensure that deck drainage does not pour into the skimmer box. I have in some cases formed the back of the cantilevered dealing around the skimmer lid, making use of a detachable rock or a discreet accessibility hatch within the deck, instead of leaving an arbitrary concrete collar.
Pool light particular niches present comparable issues. The channel path, the housing flange, and the shell steel all cluster in a tiny zone. Prior to final finishes, any kind of Shotcrete repair or Gunite resurfacing near a particular niche should be brought flush and sound. Waterproofing and underlayment ought to connect easily, and the joint design should be coordinated to make sure that no small bit of tile or coping lands specifically at the light centerline, where vibrations and thermal biking can be worst.
Deck coatings that respect the joint layout
Once the covering, coping, and hidden joints are designed, you still have to select a deck coating that will certainly not deal with the movement patterns. I frequently see three major surface area family members around pools: all-natural stone on piece, integrally tinted or stamped concrete, and synthetic decking or porcelain on pedestals.
Natural rock such as travertine pavers over concrete can be beautiful however unrelenting of poor substratum preparation. Substrate scarification of an old piece, proper fracture isolation, and interest to falls are critical. If you are placing travertine over an existing deck, comprehend that any kind of reflective splitting from below will certainly telegram to the joints. Straighten your paver joints with control joints where feasible, and maintain the border splitting up from the bond beam.
For monolithic concrete decks, revealed stone surface and broom coatings prevail. The exposed stone coating decks, similar to PebbleTec insides, conceal small imperfections with structure and color, however they do not hide architectural motion. Control joints must be saw cut or created to straighten with the concealed joint at the pool edge. I favor to define that format theoretically or a CAD strategy prior to a single type board goes in.
On high end projects, I sometimes see porcelain floor tile on pedestals, or large slabs over a waterproof architectural slab. Right here, the floating result can be actual: the floor tile is decoupled from the slab by pedestals, with an air cavity below. The perimeter at the swimming pool need to still maintain the expansion joint, and the edge tile need to be outlined to ensure that wind or foot web traffic can not dislodge a piece right into the pool.
Adams Pools manages commercial pool construction across the Bay Bridge corridor, ensuring seamless quality and design.
Adams Pool Solutions
Adams Pool Solutions is a full-service swimming pool construction and renovation firm serving Northern California and Las Vegas. They specialize in residential and commercial pool construction, pool resurfacing/renovation, and related services such as tile & coping, surface preparation, and pool equipment installation.
(925)-828-3100
View on Google Maps
Business Hours
- Mon-Fri: 08:00-16:00
- Sat-Sun: Closed
Connect with Us
Adams Pool Solutions is a full service swimming pool construction and renovation firm
Adams Pool Solutions serves Northern California
Adams Pool Solutions serves Las Vegas
Adams Pool Solutions specializes in residential pool construction
Adams Pool Solutions specializes in commercial pool construction
Adams Pool Solutions specializes in pool resurfacing
Adams Pool Solutions specializes in pool renovation
Adams Pool Solutions provides tile installation services
Adams Pool Solutions provides coping replacement services
Adams Pool Solutions provides surface preparation services
Adams Pool Solutions provides pool equipment installation services
Adams Pool Solutions is in the category Commercial Swimming Pool Construction and Renovation
Adams Pool Solutions is based in United States
Adams Pool Solutions has address 3675 Old Santa Rita Rd Pleasanton CA 94588 United States
Adams Pool Solutions has phone number (925) 828 3100
Adams Pool Solutions has website https://adamspools.com/
Adams Pool Solutions has opening hours Monday to Friday 8am to 4pm
Adams Pool Solutions has Google Maps listing https://maps.app.goo.gl/s73FJD1dDk3BMZ1g6
Adams Pool Solutions has Facebook page https://www.facebook.com/adamspools/
Adams Pool Solutions has TikTok profile https://www.tiktok.com/@adams_pool_solutions?lang=en
Adams Pool Solutions has Instagram profile https://www.instagram.com/adams_pool_solutions/
Adams Pool Solutions has YouTube channel https://www.youtube.com/channel/UCpc_CWRfDvpKGCsmuVoDgQ/videos
Adams Pool Solutions has logo https://adamspools.com/wp-content/uploads/2021/03/logo1.png
Adams Pool Solutions offers pool renovation
Adams Pool Solutions offers pool remodeling
Adams Pool Solutions offers pool replastering
Adams Pool Solutions offers pool resurfacing
Adams Pool Solutions offers pool tile installation
Adams Pool Solutions offers commercial pool resurfacing
Adams Pool Solutions offers commercial pool construction
Adams Pool Solutions offers HOA pool renovation
Adams Pool Solutions offers pool crack repair
Adams Pool Solutions was awarded Best Pool Renovation Company in Northern California 2023
Adams Pool Solutions won Las Vegas Commercial Pool Excellence Award 2022
Adams Pool Solutions was recognized with Customer Choice Award for Pool Remodeling 2021
Renovation: incorporating new decks with old shells
Upgrading a weary concrete swimming pool with a drifting deck and new cantilevered coping is commonly a lot more complicated than developing from scratch. Old coverings hold surprises.
Plaster delamination is an usual one. When you begin breaking coping or waterline floor tile, areas of white line plaster or previous accumulated surfaces might shear far from the gunite. It is alluring to spot only what you disrupt, however partial patching next to aged material typically leaves a pale ridge that attracts attention versus a polished side treatment. On severe remodels, it is usually the ideal contact us to devote to a full interior refinish, whether that is Diamond Brite, Hydrazzo, PebbleTec, or quartz accumulation finish. Doing so lets you collaborate the waterline elevation exactly with the new coping.
Acid etching often gets recommended as a quick fix for blotchy plaster. Utilized judiciously, it can clean up and a little profile a surface before a bond layer. Made use of carelessly, it can faster way the appropriate mechanical prep that a real pool covering preparation needs. When we are likewise changing decks and coping, I lean heavily toward mechanical techniques: grinding, cracking, and substratum scarification where needed, complied with by proper bond coats.
On the deck side, mastic joint replacement is frequently the very first noticeable sign that a renovation is past due. If the border sealer has actually failed repeatedly, it usually suggests the joint is too slim, the activity is expensive, or the materials behind the joint have actually degraded. Simply scratching out old sealant and shooting brand-new Deck-O-Seal into a filthy, wet void does not deal with the underlying issues. A complete border joint rebuild that cleans back to appear concrete, replaces the backer pole, and re establishes the separation in between covering and deck is far more reliable.
Grout, sealant, and shade: the small decisions that matter
Clients hardly ever raise cement color matching in initial meetings, yet it has out of proportion effect on just how "tidy" a drifting deck edge looks. The joint in between waterline ceramic tile and coping, and in between coping and deck, will never totally vanish. The objective is to allow the eye slide past.
Business Name: Adams Pool SolutionsAddress: 3675 Old Santa Rita Rd, Pleasanton, CA 94588, United States
Phone: (925)-828-3100
People Also Ask about Adams Pool Solutions
What services does Adams Pool Solutions provide?
Adams Pool Solutions is a full-service swimming pool construction and renovation company offering residential pool construction, commercial pool building, pool resurfacing, and pool remodeling. Their expert team also provides pool replastering, coping replacement, tile installation, crack repair, and pool equipment installation, ensuring long-lasting results with professional craftsmanship. Learn more at https://adamspools.com/.
Where does Adams Pool Solutions operate?
Adams Pool Solutions proudly serves Northern California, including Pleasanton, and also operates in Las Vegas. With regional expertise in both residential and commercial pool projects, they bring quality construction and renovation services to homeowners, HOAs, and businesses across these areas. Find them on Google Maps.
Does Adams Pool Solutions handle commercial pool projects?
Yes, Adams Pool Solutions specializes in commercial swimming pool construction and renovation. Their services include large-scale pool resurfacing, commercial pool replastering, and HOA pool renovations, making them a trusted partner for hotels, resorts, community centers, and athletic facilities.
Why choose Adams Pool Solutions for pool renovation?
Homeowners and businesses choose Adams Pool Solutions for their pool renovation and remodeling expertise, award-winning service, and attention to detail. Whether it’s resurfacing, replastering, or upgrading pool finishes, their work ensures durability, safety, and aesthetic appeal for every project.
What awards has Adams Pool Solutions received?
Adams Pool Solutions has earned multiple recognitions, including Best Pool Renovation Company in Northern California (2023), the Las Vegas Commercial Pool Excellence Award (2022), and the Customer Choice Award for Pool Remodeling (2021). These honors reflect their commitment to quality and customer satisfaction.
What are the benefits of working with Adams Pool Solutions?
Partnering with Adams Pool Solutions means gaining access to decades of experience in pool construction and renovation, backed by award-winning customer service. Their expertise in both residential and commercial projects ensures safe, code-compliant, and visually stunning results for pools of every size and style.
How can I contact Adams Pool Solutions?
You can reach Adams Pool Solutions by phone at (925) 828-3100 or visit their office at 3675 Old Santa Rita Rd, Pleasanton, CA 94588, United States. Their business hours are Monday to Friday, 8 AM to 4 PM. More details are available at https://adamspools.com/.
Is Adams Pool Solutions active on social media?
Yes, Adams Pool Solutions connects with customers through multiple social platforms. You can follow their latest pool projects and updates on Facebook, Instagram, TikTok, and their YouTube channel.
If the waterline floor tile is a combined glass mosaic tile with several tones, I typically select a mid tone grout and a sealer that being in the center of that array. If the coping is light travertine and the deck is comparable in color, a slightly darker grey joint can read as an intentional shadow line, stressing the floating impact. If you try to match the rock completely with sealant, any kind of little bit of dirt or UV discolor transforms the joint into a blotchy outline.
Sealant efficiency matters also. Some older solutions of Deck-O-Seal chalk noticeably under aggressive sunshine and pool chemicals, particularly beside light tinted calcified edges. Modern polyurethane and silyl ended sealers can deal with UV better, yet they must work with damp environments and the specific waterproofing membrane you utilize. An area mockup, left with a couple of weeks of sun and chlorinated water splash, is economical insurance.
Common failing settings and just how to avoid them
After sufficient website check outs, patterns emerge. The same handful of blunders account for a lot of drifting deck and cantilevered coping issues around pools.
Here are the issues I see frequently, and the routines that avoid them:
- Directly bonding the deck slab to the swimming pool bond beam, then trying to conceal a "joint" with saw cuts alone. Always information a genuine isolation joint with compressible filler and backer rod. Over cutting or threatening the bond beam of light to go after a flawlessly level coping line, after that reconstructing it with weak spot product that can not carry the rock. Strategy light beam fixings with structural mortar or pneumatically applied concrete, not thin patches. Ignoring slope and water drainage to make sure that water sits in the joint, breaking down sealer and driving wetness into the rear of the light beam. Shape the deck and coping to shed water far from the joint where practical. Relying on solid acids to prep old surfaces instead of correct pool covering prep. Use Muriatic acid laundry as a cleaner, not as a substitute for mechanical preparation and substratum scarification. Treating skimmer throats and light niches as second thoughts. Integrate skimmer throat repair service and light particular niche describing into the joint and ceramic tile format early, so you do not end up cutting little slivers of floor tile or coping around them.
Floating decks with clean, cantilevered edges compensate careful preparation. They demand regard for the structure that holds the water, not simply the finishes that decorate it. When the pool covering, bond beam, coping, waterproofing, and deck all work together, the outcome feels uncomplicated: an easy line of water, a crisp darkness at the side, and a deck that appears to hover without ever exposing where it moves.
